


对MCP的学习和理解以及基于NodeJS实现一个爬取公众号文章信息MCP服务器
1 官网MCP描述
What is MCP?
1.1 什么是MCP
MCP (Model Context Protocol) is an open-source standard for connecting AI applications to external systems.
MCP(模型上下文协议)是用于将AI应用程序连接到外部系统的开源标准。
1.2 MCP可以做什么
Using MCP, AI applications like Claude or ChatGPT can connect to data sources (e.g. local files, databases), tools (e.g. search engines, calculators) and workflows (e.g. specialized prompts)—enabling them to access key information and perform tasks.
使用MCP,像Claude或ChatGPT这样的AI应用程序可以连接到数据源(例如本地文件、数据库)、工具(例如搜索引擎、计算器)和工作流(例如专门的提示),使它们能够访问关键信息并执行任务。
1.3怎么理解MCP
Think of MCP like a USB-C port for AI applications. Just as USB-C provides a standardized way to connect electronic devices, MCP provides a standardized way to connect AI applications to external systems.
将MCP想象成AI应用程序的USB-C端口。正如USB-C提供了一种连接电子设备的标准化方式一样,MCP也提供了将AI应用程序连接到外部系统的标准化方法。
1.4 个人理解和总结
MCP本质就是一个协议用于定义AI大模型和外部数据源、工具等外部信息建立连接的标准方式,使用MCP即需要遵守一套固定的规则以使得开发者可以效率更高、更便捷、效果更好地使用大模型调用外部工具。
2 MCP的前世今生
什么是Function Calling与MCP协议?它们为何要这样设计?
这是一个超牛的up主讲解的MCP,清晰明白地讲述了MCP这个技术方案的来龙去脉
2.1 基于提示词的Function Calling
最早的大模型只能充当聊天机器人角色,只能处理文字回复文字信息,并不能成为agent去调用工具去直接帮人类完成任务。
后续产生了Function Calling的技术方案来实现这一愿望。即向大模型提供可用函数列表,并让大模型判断是否需要调用函数来实现特定需求。
最早 Function Calling 的调用主要通过 System Prompt 即系统提示词来描述和约束,开发者必须设计清晰的系统提示词,否则会出现幻觉或者出现非预期内容,例如
System Prompt 示例
# 你的角色
你是一个函数调用助手,我将提供多个函数的定义信息,包括函数名称、作用、参数及参数类型。

# 你的任务
- 根据用户的输入,判断是否需要调用某个函数
- 如果需要,请**严格按照以下格式**输出函数调用指令:
```json
{ "name": "函数名", "arguments": { "参数名": "参数值" } }

# 函数定义信息
1. **get_weather**
   - 作用:查询指定城市的天气情况
   - 参数:
     -`city`(string):城市名称
2. **get_time**
   - 作用:查询指定城市的当前时间
   - 参数:
   - `city`(string):城市名称

用户提问示例
“广州的天气怎么样?”

模型回复示例
{ "name": "get_weather", "arguments": { "city": "广州" }
以上通过提示词来约束大模型进行工具的选择和调用,这种方式需要清晰的提示词并且容易出现幻觉和非预期输出,并且存在以下问题:
- 输出格式不稳定,可能会输出多余的文字
- 容易出现幻觉,可能会编造函数
- 提示词不标准化,调用效果好不好全靠开发者编写的提示词
- 上下文消耗大,需要大量描述系统提示词,造成token大量消耗
2.2 基于API的Function Calling
即每个模型提供商会规定好函数描述,开发者至需要在函数描述填上规定的信息,但可以不再需要填写系统提示词来描述函数。
例如:
// 定义工具列表
const tools = [
  {
    type: "function",
    function: {
      name: "get_current_weather",
      description: "当你想查询指定城市的天气时非常有用。",
      parameters: {
        type: "object",
        properties: {
          location: {
            type: "string",
            description: "城市或县区,比如北京市、杭州市、余杭区等。",
          },
        },
        required: ["location"],
      },
    },
  },
];
可以有以下好处
- 函数可以不填写系统提示词,减少token消耗
- 函数描述不用放在系统提示词中,而是指定某个API字段中,便于维护
- 避免系统提示词格式不统一造成的函数调用效果质量不稳定
存在的问题
- 每家模型供应商的函数描述格式都不统一,适配一个模型就需要重新开发一次,造成冗余开发
2.3 MCP解决方案
mcp实现了什么:
- 工具导入进来就能用,即通信协议、接口定义、数据交换格式等都是统一的
- 无需开发者填写工具描述信息,而是根据标准化的配置信息自动获取
2.3.1 MCP架构
MCP Architecture overview
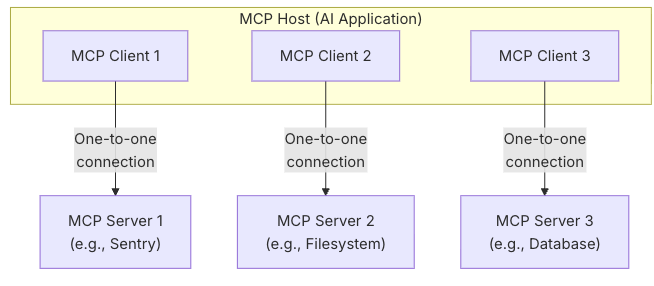
MCP架构主要由 MCP HOST 、MCP Client、MCP Server 组成
MCP follows a client-server architecture where an MCP host — an AI application like Claude Code or Claude Desktop — establishes connections to one or more MCP servers. The MCP host accomplishes this by creating one MCP client for each MCP server. Each MCP client maintains a dedicated one-to-one connection with its corresponding MCP server.
MCP遵循客户端-服务器架构,其中MCP主机(如Claude Code或Claude Desktop等AI应用程序)建立与一个或多个MCP服务器的连接。MCP主机通过为每个MCP服务器创建一个MCP客户端来实现这一点。每个MCP客户端与其对应的MCP服务器保持专用的一对一连接。
- MCP HOST:协调和管理一个或多个MCP Server的人工智能应用程序
- MCP Client:一个组件,用于维护与MCP Server 的连接, 并从MCP服务器获取上下文,供MCP主机使用
- MCP Server:一个为MCP Client提供上下文的应用程序
2.3.2 MCP传输协议
- Stdio 传输:主要用于本地进程间通信
HTTP + SSE传输(已废弃)- Streamable HTTP:用于远程通信
HTTP + SSE传输废弃原因:
- 数据格式问题:SSE的Content-Type: text/event-stream只支持文本格式,Steamable HTTP的Content-Type支持任意格式,如JSON、HTML、二进制等,更适合AI场景(可能要传JSON、音频、图片)
- 跨平台兼容问题:SSE支持等客户端主要是浏览器和少量语言库,而Steamable HTTP支持多种客户端
- 性能问题:SSE基于HTTP/1.1长连接,Steamable HTTP可以基于HTTP/2/3,支持多路复用和双向流。且HTTP/2/3的流控制和优先级机制使得高吞吐和低延迟成为可能,SSE消息只能文本格式,并且Steamable HTTP支持其他采用更紧凑的编码方式(比如二进制分包、压缩等)
3 基于NodeJS实现一个MCP服务器
以下代码参考了MCP官方文档
3.1 新建一个基于npm包管理工具的项目文件
# MacOS
# Create a new directory for our project
mkdir weather
cd weather

# Initialize a new npm project
npm init -y

# Install dependencies
npm install @modelcontextprotocol/sdk zod@3
npm install -D @types/node typescript

# Create our files
mkdir src
touch src/index.ts
3.2 修改package.json文件内容
1.修改"build": "tsc",用于将src文件下的ts文件打包为js到build目录中
2.新增"start": "node build/index.js"用于运行打包好的js文件,启动mcp服务器
3.修改"type": "module"用于使用ES模块规范导入导出
{
  "name": "mcp-server",
  "version": "1.0.0",
  "main": "index.js",
  "type": "module",
  "scripts": {
    "build": "tsc",
    "start": "node build/index.js"
  },
  "keywords": [],
  "author": "",
  "license": "ISC",
  "description": "",
  "dependencies": {
    "@modelcontextprotocol/sdk": "^1.20.1",
    "express": "^5.1.0",
    "playwright": "^1.56.1",
    "zod": "^3.25.76"
  },
  "devDependencies": {
    "@types/express": "^5.0.3",
    "@types/node": "^24.9.1",
    "ts-node": "^10.9.2",
    "typescript": "^5.9.3"
  }
}
3.3 新增tsconfig.json文件
直接复制粘贴
// tsconfig.json
{
  "compilerOptions": {
    "target": "ES2022",
    "module": "Node16",
    "moduleResolution": "Node16",
    "outDir": "./build",
    "rootDir": "./src",
    "strict": true,
    "esModuleInterop": true,
    "skipLibCheck": true,
    "forceConsistentCasingInFileNames": true
  },
  "include": ["src/**/*"],
  "exclude": ["node_modules"]
}
3.4 创建McpServer实例
1.导入相关包以及创建实例
import { McpServer } from '@modelcontextprotocol/sdk/server/mcp.js';

// Create an MCP server
const server = new McpServer({
    name: 'mcp-server-crawl',
    version: '1.0.0'
});
3.5 创建辅助函数crawlWebFn
用于调用api爬取网页
// crawlWeb.ts
import { chromium } from "playwright";
export const crawlWebFn = async (url: string) => {
    const browser = await chromium.launch({ headless: true });
    const page = await browser.newPage();
    try {
        await page.goto(url, { waitUntil: 'domcontentloaded', timeout: 20000 });
        await page.waitForSelector('#richTextContainer', { timeout: 10000 })
        const content = await page.$eval('#richTextContainer', (el) => el.textContent.trim())
        return content
    } catch (error) {
        return error
    } finally {
        await browser.close();
    }
}
3.6 注册工具
直接调用上述辅助函数,实现工具,返回爬取的网页文字内容
// Register weather tools
server.tool(
    "crawlWeb",
    "爬取获取网页内容",
    {
        url: z.string().url().describe('需要被爬取的网页链接')
    },
    async ({ url }) => {
        try {
            const result = await crawlWebFn(url) as string
            return {
                content: [
                    {
                        type: "text",
                        text: result,
                    },
                ],
            };
        } catch (error) {
            return {
                content: [
                    {
                        type: "text",
                        text: '爬取网页失败',
                    },
                ],
            };
        }
    },
);
3.7 启动服务器和HTTP transport
// Set up Express and HTTP transport
const app = express();
app.use(express.json());

// Create a new transport for each request to prevent request ID collisions
const transport = new StreamableHTTPServerTransport({
    sessionIdGenerator: () => crypto.randomUUID()
});

await server.connect(transport);

app.post('/mcp', async (req, res) => {
    await transport.handleRequest(req, res, req.body);
});

const port = parseInt(process.env.PORT || '4000');
app.listen(port, () => {
    console.log(`MCP Server running on http://localhost:${port}/mcp`);
}).on('error', error => {
    console.error('Server error:', error);
    process.exit(1);
});
3.8 完整的主代码
import { McpServer } from '@modelcontextprotocol/sdk/server/mcp.js';
import { StreamableHTTPServerTransport } from '@modelcontextprotocol/sdk/server/streamableHttp.js';
import express from 'express';
import { z } from 'zod';
import { crawlWebFn } from './crawlWeb.js';
// Create an MCP server
const server = new McpServer({
    name: 'mcp-server-crawl',
    version: '1.0.0'
});

// Register weather tools
server.tool(
    "crawlWeb",
    "爬取获取网页内容",
    {
        url: z.string().url().describe('需要被爬取的网页链接')
    },
    async ({ url }) => {
        try {
            const result = await crawlWebFn(url) as string
            return {
                content: [
                    {
                        type: "text",
                        text: result,
                    },
                ],
            };
        } catch (error) {
            return {
                content: [
                    {
                        type: "text",
                        text: '爬取网页失败',
                    },
                ],
            };
        }
    },
);

// Set up Express and HTTP transport
const app = express();
app.use(express.json());

// Create a new transport for each request to prevent request ID collisions
const transport = new StreamableHTTPServerTransport({
    sessionIdGenerator: () => crypto.randomUUID()
});

await server.connect(transport);

app.post('/mcp', async (req, res) => {
    await transport.handleRequest(req, res, req.body);
});

const port = parseInt(process.env.PORT || '4000');
app.listen(port, () => {
    console.log(`MCP Server running on http://localhost:${port}/mcp`);
}).on('error', error => {
    console.error('Server error:', error);
    process.exit(1);
});
3.9 启动服务器
1.打包
npm run build
2.运行
npm run start
3.效果
MCP Server running on http://localhost:4000/mcp
4.Cherry studio 测试连接服务器
4.1 创建服务器
填写服务器url、名称、类型、描述等,然后保存

4.2 启动并测试工具
4.2.1 选择工具

4.2.2 发送消息
测试选择一篇焦虑症相关的网页文章,让大模型爬取这个文章并总结,最终大模型成功调用工具并进行总结,符合预期效果!

5.总结
通过对MCP理论学习和实践成功实现了自己的MCP服务器开发,并使用cherry studio测试实现了客户端连接MCP服务器、大模型成功调用工具并完成预期输出。